2025 年在 GitHub Pages 搭建 Hexo 博客
0x01. 创建博客
先创建一个 GitHub 账号,然后创建一个名为 <username>.github.io 的仓库,比如 secdroid.github.io。
接下来配置 SSH 登录 GitHub,进入 Settings / SSH and GPG keys,可以参考 GitHub 提供的 Guide 进行设置:
- 执行
ssh-keygen -t ed25519 -C "your_email@example.com"创建 SSH 密钥 - 把
~/.ssh/id_ed25519.pub的内容添加到 GitHub 的 SSH keys 中 - 执行
ssh-add命令
1 | eval `ssh-agent -s` |
记住一定要执行第一条 eval 命令,否则执行 ssh-add 时会提示 Could not open a connection to your authentication agent.。
接下来就可以克隆仓库并进行初始化设置了,步骤如下:
1 | git clone git@github.com:secdroid/secdroid.github.io.git |
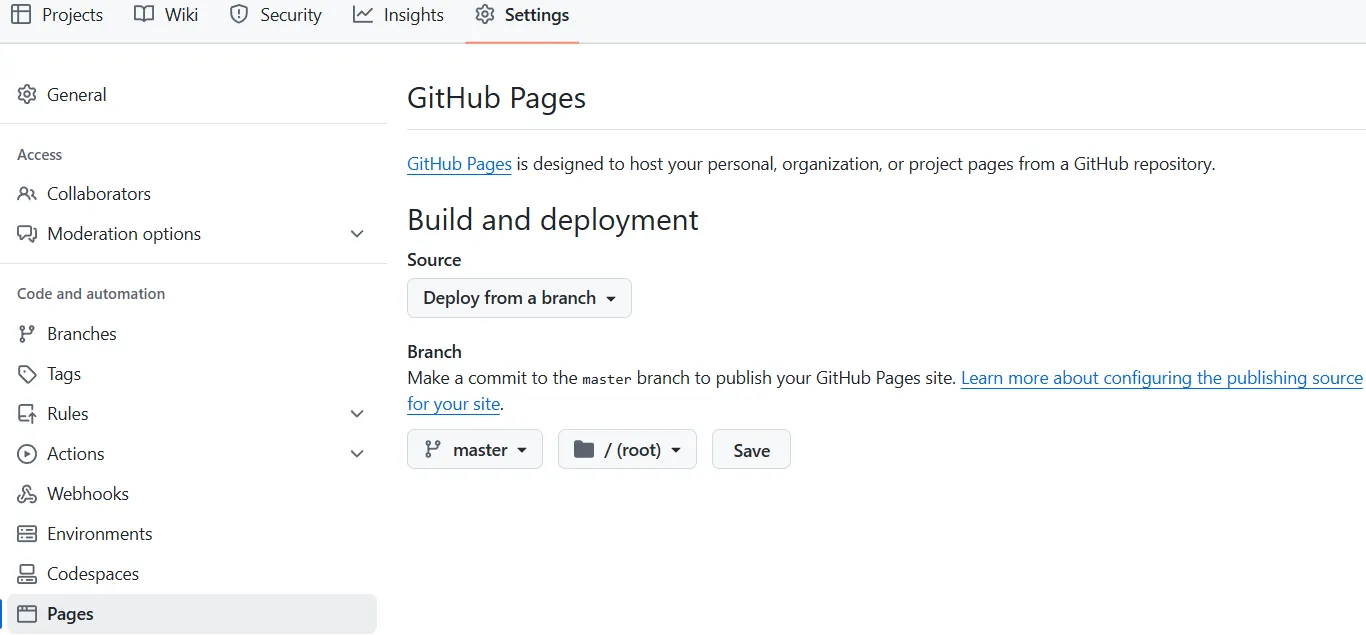
接下来进入仓库的 Settings / Pages,关联 master 分支到 /root,并保存设置。至此 https://secdroid.github.io 就可以正常访问了,不过打开之后空空如也,一个完整的博客还需要设置一个简洁且美观的主题。
0x02. 安装 Hexo
输入以下命令完成安装操作(某些操作可能需要科学上网)。
1 | sudo apt install npm |
之后执行 hexo s 开启本地监听服务,可以本地访问 http://localhost:4000/ 或者局域网访问查看效果。
0x03. 安装 NexT
NexT 是 Hexo 的一款主题,输入以下命令完成安装操作。
1 | 确保位于 blog 文件夹下 |
之后修改博客根目录下的 _config.yml 文件,把主题设置为 theme: next,然后执行如下命令重新生成博客页面。
1 | hexo g |
打开 URL 发现加载有点慢,F12 查看请求列表,发现字体是从 Cloudflare 请求的,可以考虑替换成其他镜像站的字体。
0x04. 博客配置
4.1 基本信息
还是修改博客根目录下的 _config.yml 文件,几个可以修改的参数:
1 | # Site |
注意 url 参数要使用 https,保持对搜索引擎的规范性和友好性。
4.2 Deploy
先安装 hexo-deployer-git 插件,并修改 _config.yml 进行配置。
1 | npm install hexo-deployer-git |
之后通过如下命令进行部署,之后就可以看到仓库的内容跟新了。
1 | hexo g |

0x05. NexT 配置
5.1 配置文件
官方建议通过如下方式创建和修改配置文件:
1 | Installed through npm |
5.2 主题风格
主题风格默认是 Muse,界面不是很好看,最重要的是页面太窄,展示长代码行尤其不美观,可以切换到 Pisces。
1 | cat _config.next.yml | grep scheme |
为什么 NexT 主题设置 Pisces 风格不生效?
不知道是 Hexo 还是 NexT 主题的 Bug,从其他主题风格(比如默认的 Muse)改到 Pisces,重新执行 hexo g 之后,居然不生效。分析发现 CSS 文件 /css/main.css 还是原来的,重复执行 hexo g 也不解决问题。最后的解决方案是:先执行 hexo clean 清理 public 文件夹下的数据,然后执行 hexo g 重新生成静态页面。
通过 hexo d 完成仓库部署后,由于 Chrome 浏览器的缓存原因,可能需要等一会才能看到效果。也可以 F12 调出控制台,切换到 Network 页面,选中 Disable cache 后刷新页面即可清除浏览器缓存重新发起请求(测试完毕后记得去除勾选)。
5.3 导航栏 & 页面
配置导航栏:
1 | menu: |
上面的链接许多都不存在,还需要进行配置:
- 文章分类页面
1 | hexo new page categories |
- 文章标签页面
1 | hexo new page tags |
- 文章模板
1 | cat scaffolds/post.md |
- 链接页面
1 | 创建页面 |
- 关于页面
1 | hexo new page about |
- Sitemap 页面
1 | npm install hexo-generator-sitemap |
5.4 文章摘要
在博客首页或者是后续分页页面,博客文章是全文显示的,这样给读者带来的体验非常不友好,因此需要设置成只显示文章标题,或者是显示摘要的形式。
NexT 主题本身不支持只显示文章标题(类似归档页面的效果),但支持显示摘要,且默认配置已经打开了,可以通过 _config.next.yml 查看:
1 | # Read more button |
实际使用时,只需要在文章的 Markdown 中插入代码 <!--more--> 即可,此代码之前的部分将当作摘要显示,之后的部分不会显示,点击文章标题或者阅读全文按钮展示全文。
5.5 关闭目录自动编号
在使用 Markdown 编写文章时,笔者喜欢手动添加目录章节编号,而 Hexo NexT 主题默认会自动编号,这会导致不够美观:

解决方案:修改 _config.next.yml,将 toc.number 改为 false 即可。
1 | # Table of Contents in the Sidebar |
0x06. Google 收录
把博客地址提交给 Google 搜索引擎,以便更多的人可以看到我们的分享!如果没有外链引用(文章引用、友情链接等),Google 可能根本不会发现我们的博客,所以我们要主动提交。
进入 Google Search Console,选择上传 HTML 文件来验证域名所有权,下载 HTML 文件之后,存放在如下目录:
1 | ls node_modules/hexo-theme-next/source/ |
这里的 google4894c0d5b0d4937b.html 便是从 Google Search Console 下载的验证文件,同时我们还提供了 robots.txt 文件,方便搜索引擎使用:
1 | # allow google |
为什么要上传到 node_modules/hexo-theme-next/source 而不是 source/_posts 呢?因为在执行 hexo g 的时候,source/_posts 下的 HTML 文件会被特殊处理,比如插入侧边栏、Footer 等等,这种场景下已经不是原始的 HTML 文件了,所以 Google Search Console 无法通过认证。
验证通过后,提交站点地图给 Google Search Console 即可。有可能会提示“无法抓取”的错误,非常奇怪!
0x07. 参考文档
- https://mini-pi.github.io/2024/02/28/how-to-make-blog-wedsite/
- https://theme-next.js.org/docs/getting-started/configuration.html
- https://linlif.github.io/2017/05/27/Hexo使用攻略-添加分类及标签/
- https://github.com/hexojs/hexo-generator-sitemap
- https://wangxchun.github.io/2018/09/05/hexo%20cancel-auto-numbering-in-directory/